
TL;DR — You can start yield farming with under by using Layer 2 networks like Arbitrum or Polygon, where gas fees are under .10. Deposit into a Curve stablecoin pool or an Aave lending pool to earn 2.5-4% APY with minimal risk. Avoid Ethereum mainnet — a single transaction costs more than a week of yield on a small position. With -500, stablecoin strategies on Layer 2 are your highest risk-adjusted return.
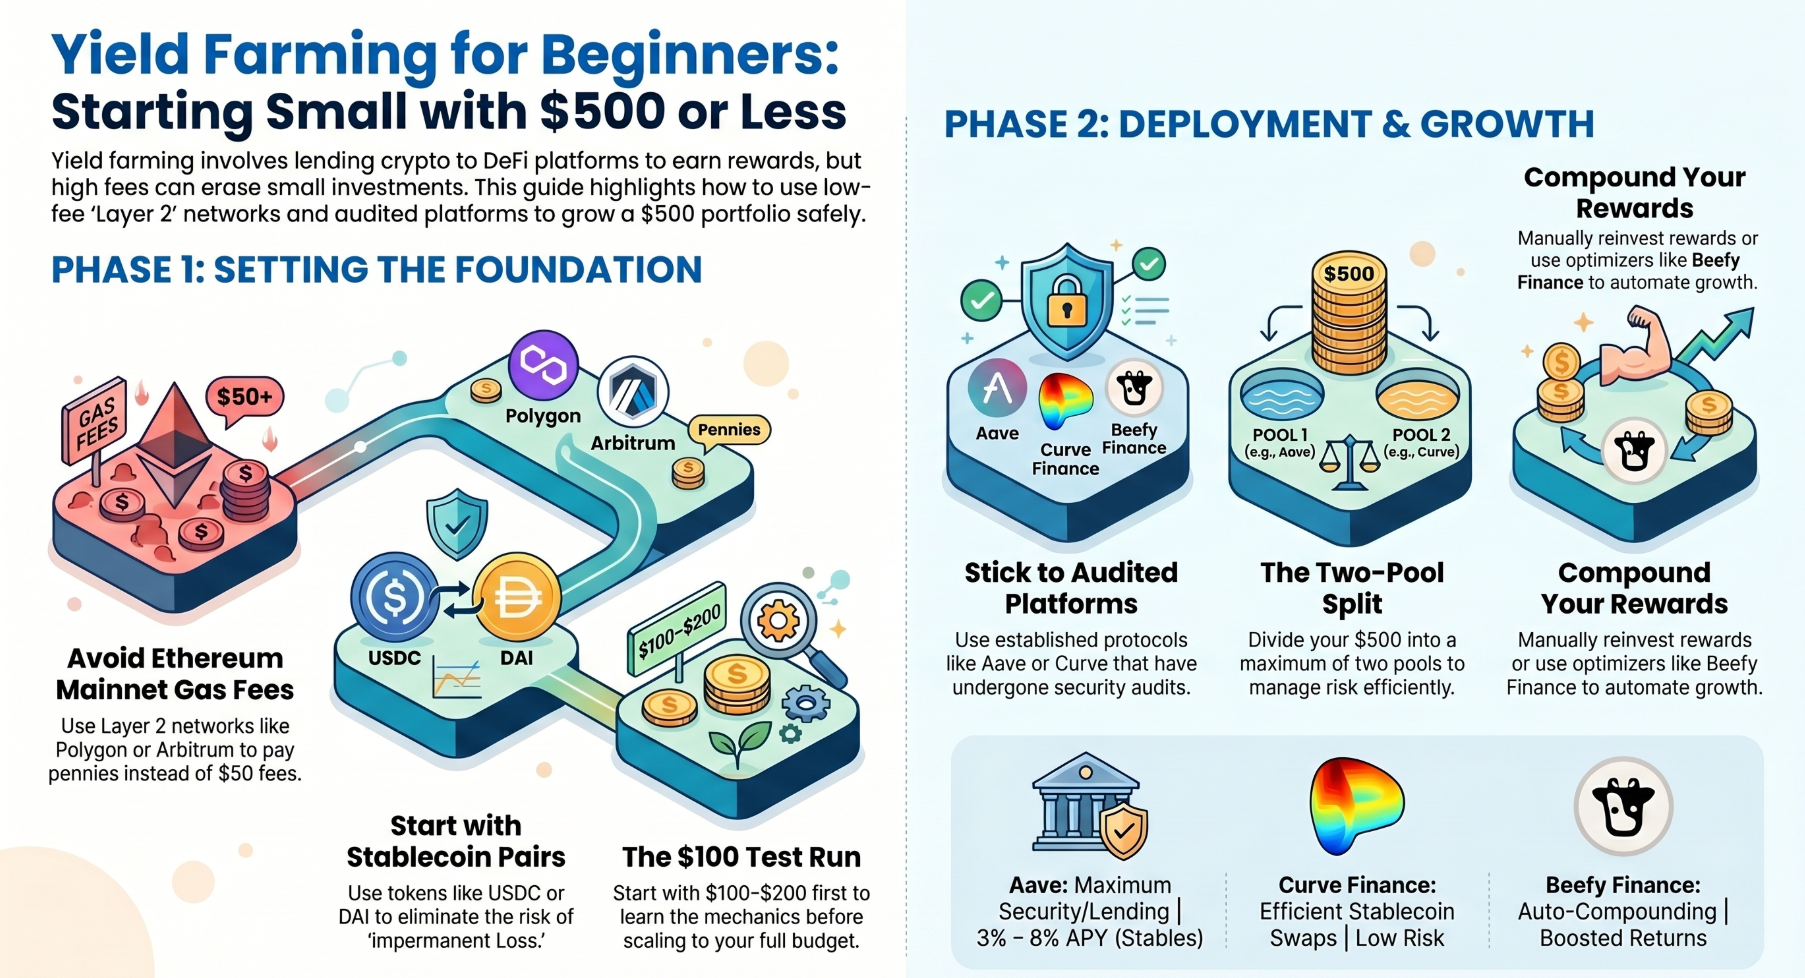
? Quick Answer: Yes, you can start yield farming with limited capital – as little as $100-$500. The key is to avoid Ethereum mainnet gas fees by using low-fee networks like Polygon or Arbitrum, stick to audited platforms like Aave or Curve, and split your investment across no more than two pools. At Bitcoinethxrp, we recommend beginners start with $100-200 on Polygon to learn the process before scaling up.
Disclosure: This article contains affiliate links. If you sign up or buy through them, bitcoinethxrp.com may earn a commission at no extra cost to you. We only recommend products we have researched in depth.
Part of our DeFi Passive Income guide. How we research and review.
Key Takeaways: Yield Farming Under $500
- Yield farming with $100-$500 is practical – the single most important decision is avoiding Ethereum mainnet, where one transaction can cost $20-$50 in gas.
- Use Polygon (fees ~$0.01) or Arbitrum (fees ~$0.10-$0.50) instead; both support the same major protocols as Ethereum at a fraction of the cost.
- Best starting platforms: Aave on Polygon (2.81% APY on USDC as a 30-day average to 31 August 2026, multiple audits) and Curve Finance (low impermanent loss risk on stablecoin pairs).
- Stick to stablecoin pools while learning – impermanent loss on volatile pairs can easily wipe out your yield on a small position.
- Split across no more than two platforms and start with $100-200 before scaling; never concentrate your entire position in a single protocol.
- All yield farming rewards are taxable income in most jurisdictions – track every transaction from your first deposit.
Why $500 Is Actually Enough to Start Yield Farming
I’ll be honest with you – when I first heard about yield farming, I thought you needed thousands of dollars to even get started. Boy, was I wrong!
Ready to scale up? Once you’re comfortable, explore our full ranking of the best yield farming platforms by APY & risk.
The truth is, you can absolutely start yield farming with under $500, and I’m going to show you exactly how. I remember sitting at my desk, staring at my modest savings account, wondering if DeFi was just for the crypto whales. Turns out, some of the best opportunities are actually designed for smaller investors like us.
Here’s the thing though – starting small means you gotta be smart about it. Gas fees can eat you alive if you’re not careful, and picking the wrong platform can turn your $500 into $300 real quick. But don’t worry! I’ve made those mistakes so you don’t have to.
Understanding the Basics: What You’re Actually Getting Into
Before we dive into the step-by-step stuff, let me break down what yield farming actually is. Think of it like this – you’re basically lending your crypto to help DeFi platforms run smoothly, and they pay you interest for it. Simple, right?
The platforms need liquidity (that’s just a fancy word for available funds) to let people trade, borrow, and do all sorts of DeFi stuff. You provide that liquidity, and boom – you earn rewards. These rewards usually come in two forms: trading fees from the platform and governance tokens.
Now here’s where it gets interesting. The Annual Percentage Yield (APY) you see advertised? Yeah, that can be anywhere from 5% to over 100% depending on the platform and the token pair you choose. But remember – higher returns usually mean higher risk. That’s just how it works in crypto.
Choosing the Right Blockchain Network (This Matters More Than You Think!)
This is where I messed up big time when I started. I jumped straight onto Ethereum because, well, it’s Ethereum — and my first transaction cost about $50 in gas. On a $500 investment that is 10% gone before you have earned anything. If you are working with under $500 you need a Layer 2 or an alternative chain, full stop.
| Network | Typical transaction cost | Verdict for a $500 stake |
|---|---|---|
| Ethereum mainnet | Around $50, and $20–$50 is normal when the network is busy | Don’t. One transaction is 10% of your capital |
| Polygon | Cents, not dollars | My pick for beginners — lowest friction, and most established platforms are deployed there |
| Arbitrum | $1–$5 | Workable, and you are still on Ethereum security. Costlier per transaction than Polygon |
| Binance Smart Chain | Lower still than Polygon | Cheapest of the four, but more centralised — some people aren’t comfortable with that tradeoff |
Polygon is my personal favourite for beginners: fees in cents, plenty of established platforms, and it is easy to bridge in from Ethereum if that is where you are starting.
Setting Up Your Wallet the Right Way
You’re gonna need a non-custodial wallet, and MetaMask is probably your best bet. I know, I know – there’s like a million wallet options out there. But MetaMask works with pretty much every DeFi platform, and it’s relatively user-friendly once you get the hang of it.
Download it as a browser extension (Chrome, Firefox, or Brave all work great). When you set it up, you’ll get a seed phrase – this is SUPER important. Write it down on paper, maybe even twice, and keep it somewhere safe. Seriously, if you lose this, your funds are gone forever. No customer service can help you.
Once you’ve got MetaMask installed, you’ll need to add the network you want to use. For Polygon, you’ll need to manually add the network details. Don’t worry, it sounds complicated but it’s literally just copying and pasting some information. You can find the exact details on Polygon’s official website.
Getting Your Funds Ready: The Bridge Situation
So you’ve got your $500 ready to go. If it’s in fiat currency, you’ll need to buy some crypto first. Most people start by buying on a centralized exchange like Coinbase or Binance, then transferring to their MetaMask wallet.
Here’s a pro tip I wish someone had told me: buy your crypto on an exchange that supports direct withdrawals to your chosen network. For example, if you’re using Polygon, some exchanges let you withdraw USDC or MATIC directly to Polygon. This saves you from having to bridge later, which costs extra fees and time.
If you do need to bridge (moving funds from one blockchain to another), use official bridges like the Polygon Bridge or Arbitrum Bridge. Yeah, there are faster third-party bridges, but when you’re dealing with your hard-earned money, it’s worth the extra 10 minutes to use the official one. I’ve heard too many horror stories about people using sketchy bridges and losing funds.
Picking Your First Yield Farming Platform
This is where the rubber meets the road. With $500 you want a platform that is established, has good security, and offers a decent return without being too risky. My three picks for beginners:
| Platform | What it’s for | Why it suits $500 | The catch |
|---|---|---|---|
| Aave | Supplying stablecoins like USDC or DAI and earning interest from the moment you deposit | Probably the safest bet — one of the oldest and most trusted DeFi lending platforms, audited many times over | The APYs aren’t high: 2.81% on Polygon and 3.81% on Ethereum for stablecoins as of 31 August 2026 |
| Curve Finance | Stablecoin swaps and stablecoin liquidity pools | Built specifically for stablecoins, so the impermanent loss risk is far lower than a volatile pair | The interface looks like it is from 1995. Don’t let that fool you — it is efficient and secure |
| Beefy Finance | A yield optimizer that compounds your rewards for you automatically | Runs on Polygon and BSC, so the compounding is not eaten by gas. Beginner-friendly | You are trusting a second contract on top of the underlying protocol, and it takes a performance fee |
Understanding Impermanent Loss (Yeah, It’s a Thing)
Okay, so this is probably the most confusing part of yield farming, but stick with me. Impermanent loss happens when you provide liquidity for a trading pair (like ETH/USDC), and the price of one token changes relative to the other.
Let me give you a real example. Say you put in $250 of ETH and $250 of USDC into a liquidity pool. If ETH’s price doubles, you’d actually have less total value than if you’d just held the ETH and USDC separately. Wild, right? The loss is “impermanent” because it only becomes permanent when you withdraw your funds.
This is why I always recommend beginners start with stablecoin pairs like USDC/DAI or USDC/USDT. Since both tokens are pegged to the dollar, there’s minimal price divergence, which means minimal impermanent loss. You won’t get the crazy high APYs, but you also won’t wake up to find your investment down 20%.
Step-by-Step: Making Your First Deposit
Let’s walk through this together. I’m using Aave on Polygon as the example because it is straightforward and safe.
- Get some MATIC for gas. Even though Polygon fees are cheap you still need a little. About $5 worth is plenty to start.
- Hold your main investment in a stablecoin such as USDC.
- Switch MetaMask to the Polygon network before you do anything else, then go to the Aave site and connect the wallet.
- Approve the connection. You are not giving the site access to your funds — you are letting it see your wallet address.
- Pick your asset and amount. Click USDC (or whichever stablecoin you hold) and enter an amount. Start with half your funds just to test the process.
- Click Supply and confirm in MetaMask. Expect two transactions the first time: one to approve the token, one to deposit it. This is normal — the approval lets the smart contract interact with your tokens.
- Wait for both to confirm — usually about 30 seconds on Polygon. You start earning interest immediately after that.
Monitoring Your Investment and Compounding Rewards
Here’s something I didn’t realize at first – most platforms don’t automatically compound your rewards. You need to manually claim them and reinvest them to maximize your returns. Some platforms like Beefy do this automatically, which is why they’re called yield optimizers.
I check my positions maybe once a week. More than that and you’ll drive yourself crazy watching the numbers. Less than that and you might miss important updates or opportunities to compound your rewards.
Set up alerts for the platforms you’re using. Most have Discord or Telegram channels where they announce important updates. You want to know if there’s a security issue or if they’re changing their reward structure. Trust me, staying informed is part of the job when you’re yield farming.
Managing Risk When You’re Starting Small
With only $500, you can’t really diversify across a ton of platforms because the gas fees would eat you up. But you can still be smart about risk management. Here’s what I do:
Never put all your funds in one platform, even if it seems super safe. I usually split my investment between two platforms – maybe 60% in something conservative like Aave, and 40% in something with higher yields like a Curve pool. This way, if one platform has issues, I’m not completely wiped out.
Stick with audited platforms. Before you deposit anywhere, check if they’ve been audited by reputable firms like CertiK or ConsenSys Diligence. You can usually find this information on the platform’s website or documentation. If they haven’t been audited, that’s a red flag.
Start small and scale up. I know it’s tempting to dump all $500 in at once, but seriously, start with like $100-200 first. Get comfortable with the process, make sure everything works as expected, then add more funds. There’s no rush.
Common Mistakes to Avoid (I’ve Made Them All)
- Don’t chase crazy high APYs. If something offers 500% APY there is usually a catch — either the rewards are paid in a token that is rapidly losing value, or it is a new platform that hasn’t been properly tested. Stick with established platforms offering reasonable returns.
- Watch out for gas fees on Ethereum mainnet. I can’t stress this enough. A single transaction can cost $20–$50 during busy times, which is a huge chunk of a $500 investment. Use Layer 2s or alternative chains.
- Don’t forget about taxes. In most countries your DeFi earnings are taxable. Keep track of your transactions and rewards — Koinly or CoinTracker will do it for you. Future you will thank present you for keeping good records.
Scaling Up: What to Do When You’ve Got More to Invest
Once you’ve got the hang of things and maybe grown your initial $500 a bit, you can start exploring more advanced strategies. Maybe you move some funds to Ethereum mainnet where there are more opportunities. Or you start looking at more complex strategies like leveraged yield farming (though be careful with that one).
The key is to learn as you go. Every platform is a little different, every token pair has its own characteristics. The experience you gain starting with $500 is invaluable, and honestly, it’s better to learn with a smaller amount than to jump in with $10,000 and make expensive mistakes.
Final Thoughts: You’ve Got This!
Look, yield farming with under $500 is totally doable. I started with even less, made plenty of mistakes, but learned a ton and actually made some decent returns. The key is to start conservative, use low-fee networks, stick with established platforms, and don’t get greedy.
Is it going to make you rich overnight? Nope. But it’s a great way to learn about DeFi, earn some passive income, and get your feet wet in this space. Plus, the skills you learn now will serve you well as you grow your crypto portfolio.
Remember, the DeFi space moves fast. What’s true today might change tomorrow. Stay informed, stay cautious, and never invest more than you can afford to lose. And hey, if you’ve got questions or want to share your own experiences, drop a comment below. We’re all learning together in this space!
Now go forth and start farming those yields! Just remember to start small, be patient, and always do your own research before depositing funds anywhere. You’ve got this!
Frequently Asked Questions: Yield Farming with Limited Capital
Can I really start yield farming with limited capital under $500?
Yes. You can start yield farming with as little as $50-$500 as long as you avoid Ethereum mainnet and use low-fee Layer 2 networks like Polygon or Arbitrum, where gas fees are just a few cents. At Bitcoinethxrp, we recommend starting with $100-200 to learn the mechanics before committing more capital.
What is the best platform for yield farming with limited capital?
For beginners with limited capital, Aave on Polygon is the best option – it’s audited, established, and offers 2.81% APY on USDC as a 30-day average to 31 August 2026, with minimal gas fees. Curve Finance is another strong choice for stablecoin pairs with low impermanent loss risk.
How do I avoid high gas fees when yield farming with a small budget?
Never use Ethereum mainnet if you have under $500. A single transaction can cost $20-$50 in gas fees during peak times. Use Layer 2 networks instead: Polygon (fees ~$0.01), Arbitrum (fees ~$0.10-$0.50), or Optimism. These networks support the same DeFi protocols at a fraction of the cost.

Bernard Mudafort is the founder and lead writer of bitcoinethxrp.com. He has been active in DeFi since 2018 and has personally tested yield farming strategies on Aave, Curve, Uniswap, and Arbitrum, focusing on sustainable, risk-managed approaches to crypto passive income.